

What you will need:
– an empty box (large enough to fit a Leprechaun)
– a piece of cardboard (the same length as your empty box)
– multiple pieces of colorful paper
– cutting tool
– scissors
– eco-friendly packing tape
– pencil and markers
– something to use as a “pot o’ gold”
– leftover yellow eco-felt
– coins and something that smells yummy (we used a stick of gum)

Step 1: Design the Trap
I did this project with Eben when he was little, he was so intrigued by the idea of actually capturing a Leprechaun and insisted that he only wanted to see one and take its photograph. Then, of course, he would release it. I asked him to sit down with pencil and paper and design the perfect trap in honor of St. Patrick’s Day. He did so with delight and your child will enjoy being the brainchild behind the project, too.
Step 2: Build the Trap
Once your child has designed the trap, get to work creating it. We taped a piece of cardboard to the back of the empty box to hold the rainbow. We also taped the empty box closed and then covered it with white office paper scraps.

Step 3: Add the Rainbow
Using scissors, let your child cut out several rainbow stripes to create a backdrop rainbow above the trap, secure with eco-friendly packing tape.
Step 4: Make the Pot o’ Gold
Cover a small cylinder-shaped object for the pot o’ gold in leftover black paper scraps. We used a pencil sharpener covered in black paper, however, you could use a small jar, food container, or even a toilet paper roll cut in half.
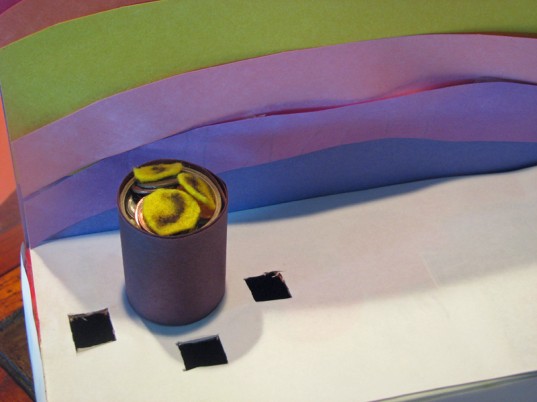
Step 5: Create the Trap Doors
Place your pot o’ gold at the “end of the rainbow” and mark three places to cut the holes that the Leprechaun will fall into (while trying to steal your gold) using your cutting tool.
Step 6: Disguise the Trap Doors
Using leftover blue paper, cut out three clouds that will cover the trap holes. Place the clouds over the holes. When the Leprechaun steps on the clouds to reach the pot of gold, he will fall in and become trapped inside the box.

Step 7: Decorate the Trap
Give your child creature control and a stack of markers or crayons to decorate the outside of the trap any way that they would like. Just remember that Leprechauns like “outdoor” colors and are attracted to bright, shiny objects. My son also decided to use a leftover piece of cardboard to create a ladder, so the Leprechaun could climb up to the pot o’ gold.

Step 8: Set the Trap
Fill the pot with gold coins that you made from the leftover eco-felt. We also mixed in real coins and a piece of bubblegum. (My son was positive the Leprechauns would be attracted to the minty scent.) Place the pot o’ gold in between the three traps.
Step 9: Leave the Trap and Wait
Find a quiet place for your Leprechaun trap. My son chose the counter in our kitchen because he thought the Leprechauns may be looking for food. However, you can also place your trap outside among the trees and bushes, since this is one of the places that Leprechauns tend to frequent. Then, smile with delight as your child periodically checks to see if the trap has been sprung. Just maybe, by St. Patrick’s Day, your child will find a Leprechaun in the trap, if not – hopefully “Mr. Leprechaun” left a small surprise or his green and gold glitter footprints.
Spend the afternoon with your littles creating a Leprechaun trap and they will be engrossed in the entire process from design to set-up and will be checking the trap consistently. Your little one can get in on the St. Patrick’s Day crafting fun by following our easy Leprechaun trap how to.
No comments yet.