Tag Archives | green projects

Probiotics on a Budget: How to Make Homemade Sauerkraut

DSC00198

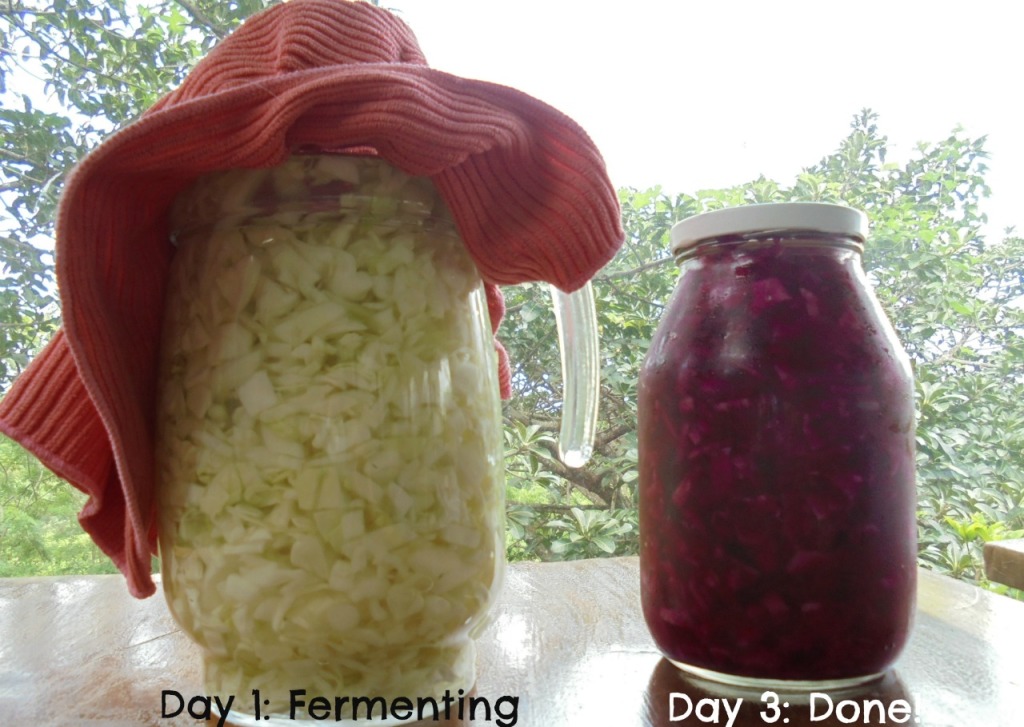
(Note: Day 1 is with green cabbage, and Day 3 is with Red. Take a look at how the cabbage “breaks down” – it’s the same amount in each container!)

Homemade sauerkraut is incredibly easy to make, is inexpensive compared to buying it in a store, and is great for you! All cruciferous vegetables (radishes, cabbage, broccoli, bok choy, etc.) naturally contain the beneficial bacteria lactobacillus, which is also found in yogurt and other fermented and cultured foods. Sauerkraut is then made by a process appropriately called lacto-fermentation, where the cabbage is submerged in a salt water solution, called brine. Then, as the sauerkraut sits, the bacteria begins to convert sugars in the cabbage into lactic acid, which is a natural preservative to prevent the growth of harmful bacteria.

Over the course of a few days, the cabbage becomes less crunchy, and the probiotics start to flourish and multiply, thus creating an amazingly tasty fermented probiotic you can eat whenever your heart desires! Here’s my recipe:

Ingredients:

  • 1 small head of red or green cabbage, about 8 cups
  • 1.5 Tablespoons of sea salt (Make sure to get sea salt and not iodized salt!)
  • Between 2-3 cups of chemical free water (spring/distilled water should be ok) If you only have tap water, let it sit out in an open container for 6 hours, and the chlorine and other chemicals will escape. Then you can use it without any trouble!

Supplies:

  1. Large knife, long enough to cut through the entire head of cabbage
  2. Cutting Board
  3. Large pitcher
  4. Several smaller mason jars, or another similar glass container with a wide mouth
  5. Cheesecloth(s) or microfiber washcloth(s) that air can easily pass through, but bugs can’t
  6. Rubberband(s) or elastic(s)  large enough to fit around the wide mouthed container(s)
  7. Cup, plate, or other object that fits inside the wide mouth container to use as a press (optional, but makes life easier)

How To:

1. Clean your cutting board, knife, and containers thoroughly, then wash your hands. It is very important to make sure that the lactobacillus bacteria have as clean of an environment as possible in which to grow. If there is a bit of bacteria on your hands when you prepare the sauerkraut, it is possible that the batch will be bad, or may even grow mold. Yuck! The salt does help prevent this, but why not give the cabbage a little boost?

2. Chop up the cabbage into pieces about as large as the nail on your pinky finger. If they’re a bit larger, that’s ok, it just helps get all of the pieces into your containers more easily. I recommend cutting the head of cabbage into four, starting with your first cut directly through the center of the stalk. Then cut those pieces in half, and then slice in small slivers until you get the size you need. This can get messy!

3. Place the cut up cabbage in a large bowl or pot, preferably not plastic. Add enough water to cover about half of the cabbage, then add the salt. Massage the cabbage with clean hands for 5-10 minutes. You’ll know it’s done when the texture of the cabbage starts to change. This is to start the fermenting process, and to dissolve the salt, so it can start it’s job of preventing the bad bacteria from flourishing.

4. Place water and cabbage into the containers, and position your press so that it pushes down the sauerkraut, and the water completely covers it. This can be a little tricky, depending on what you’re using, and may take a bit of maneuvering at first. It is very important that the water be covering the cabbage during the entire process, or the cabbage starts to rot, and you will see a moldy film appear! If you choose to not use the press, proceed with the directions, but check the containers every few hours for the first day or so and make sure that no cabbage is poking out of the water.

5. Cover with the breathable fabric, and place the elastic around the mouth of the container. Set in a room temperature spot (65-75 degrees F) for three days, and check the taste. This is when the cabbage is considered sauerkraut, and this is when you can start to jar it and put it in the fridge. If it’s not sour enough to your liking, let it sit for up to 3 weeks, and taste test along the way.

When it comes to sauerkraut, I am super impatient and eat it on day three. Maybe I’ll get my assembly line going so I can try some that has fermented longer!

Overall, my batches of sauerkraut probably cost around $1 per jar. Compare that to the pasteurized jars in the grocery stores, that’s a 75% discount, not to mention the amazing probiotic benefits! Compare it to the completely raw stuff you’ll find at your local health food store, it’s a steal!

If you’re still not set on making sauerkraut, or just don’t like the taste, I understand. We just started making water kefir, another type of probiotic drink, and I’ll show you how to make kefir soda once I have mastered it myself!

Happy Sauerkraut-ing!

3 Simple Eco-Friendly Halloween Costumes Tips

Carmen Sandiego

by Briana

Halloween is right around the corner, are you and the kids ready? Time to take out the spooky decor and start thinking of awesome costume ideas. Personally I love Halloween, it’s that time of year when you can be silly and let your creativity run wild. When I was a kid growing up my mom always made my Halloween costumes.  There was no costume idea that I came up with that she couldn’t do. Honestly she still helps me make awesome costumes not only for myself but for my husband and son, we always have a blast! Now let’s get into it. Here are 3 simple ways to keep your costume making eco-friendly:

1. Hit Up Your Local Thrift Shop
Not only do I love to shop at thrift stores for my everyday fashion pieces but it is a Halloween costume cave of wonders! A couple of years ago I wanted to be Carmen Sandiego, so I hit up my local thrift store in search for my costume.  Before going into the store I already had in mind what I needed to find. There were three must-have items, her famous red coat, a black hat, and a yellow band. I found an 80’s bright red oversize blazer so I used that for the coat. The final product is the photo above – what do you think?

2. Rummage Through your Closet
Last year was the first Halloween my husband and I had with our son. You can only imagine how excited I was to come up with the cutest family Halloween costumes! We decided on Mario and Luigi for my husband and son (How cute right?!). Their costumes were the easiest thing to put together. For Donavon, we needed jean overalls (yes he had a pair of jean overalls, don’t ask me why) a green t-shirt, a hat, extra green t-shirt(to cover the hat) and a hat. For my son, a red tee,  jean overalls, and a red baby hat. We used white paper we had at home and added the L and the M to the hats as well.

3. Costume Swap with a Friend or Relative
Think your past costumes are going to sit in your closet forever? Think again! Instead, call up a friend or family member and ask them if they kept any of their old Halloween costumes, not just for you but for the kids as well. When I was still pregnant I bought his Halloween costume ahead of time because I couldn’t help the excitement of purchasing this tiny little baby costume. However, when Halloween rolled around it no longer fit him, needless to say it is still sitting in a drawer and has never been used. I’m sure this is the case with many of our friends and family, so save some money and the environment with a costume swap!

What other ways are you making your Halloween costume eco-friendly?


Save the Planet, One Upcycle at a Time

upcycle

by Beth

I love recycling. It makes me feel like I’m doing my little part to help save the world. I also feel a little guilty whenever I drop my recycling off because I’m always thinking of ways to reuse things. A great spin on reusing your recycled and no longer needed goods is “upcycling” which you may have heard of before. Upcycling is upgrading something that would otherwise just be recycled. It’s so simple, saves money, and turns anyone into an artist!

I am an avid upcycler, and love to reuse anything I can get my hands on. A few years ago, I found an old, 70’s or 80’s style coffee table, and turned it into an ottoman with about $15 worth of supplies. It was super fun, and I got so many compliments! I also upcycle clothes, since I’m a huge thrift shopper. When I find something I can’t wear right off the rack due to size, I whip out my sewing machine, and get to work. All it takes is a few stitches to turn an old skirt into a dress, or make a quilt out of a bunch of T-shirts. Now, you don’t have to do anything complex to upcycle, all it requires is creativity and an ever-inspired mind.

Here are a few of my favorite ways to upcycle:
1. Turn old pallets into furniture, wall gardens, and more. I’ve even seen pallets turned into movie theater styled seating, how awesome!
2. Take an old rain barrel and turn into a composter for your biodegradable scraps and use the compost as fertilizer for your garden.
3. Wine glasses and glass bottles can be used for so many things. I used mine as wall decorations and a night light for my bathroom.
4. Turn bottle caps into tea lights with shoe lace and wax from used candles.
5. I’ve never done this one, but have always wanted to – turn an old TV into an aquarium!

I hope I got those creative juices flowing – it’s only a matter of time before you’ll be thinking about what you can do with all that stuff left on the curb on garbage day.
Have you upcycled before? If so, tell me your favorite or most memorable upcycling project in the comments section above!

Have a Lovely Weekend + A Few Green Things

fall

Hello, Friends! How was your week? I hope it was a nice one. Are you experiencing fall weather or maybe even winter weather where you live? It’s amazing how quickly the weather changes, and all of sudden we are in fall. Even here in Florida, it has been a little cooler than usual. It will only last a couple of days though, so I better enjoy it! As the mister and I were sitting on the patio last night, he pointed at my legs and laughed that I had goosebumps!

The cooler weather has me thinking of Halloween which just makes me more excited. Am I the only one? I have found myself pinning all kinds of Halloween ideas lately! And I have already started to think of costume, food, and decor ideas too. I jokingly asked the mister if it was too early to break out the decorations – he just gave me the look. I guest October 1st is early enough for him. Ha! While I pin a few million more ideas, here are a few green things to take you into the weekend:

– This adorable piggy knows how to cool off in style.
– Have you ever tried Aloe Vera Water? I want to try it.
– You can still plant a fall garden, this will get you started.
– I am happy to hear Whole Foods is offering more affordable produce and core items.
– What if everyone swapped their cars for bikes! Yes.

I hope you have an amazing fall weekend, I will see you back here on Monday!

xo,
Sweet Greens

Have a Lovely Weekend + A Few Green Things

Jennie Lyon Green Market

Hello, Friends! How was your week? Are you getting into the back to school routine? Can  you believe it is already September? It’s been a good school year here so far, just chugging along. So nice!

Since summer seemed so crazy busy to me, I have a lot of fun plans sprinkled into the Lyon family schedule for fall and winter. And with Thanksgiving and winter break right around the corner, I find myself giddy thinking about it! Are you the same way? Do you find yourself craving more family time, game nights and secret road trips? Me too! Well, I better get back to work – it is Friday after all, which means there are a lot of last minute things to finish up! While I get back to work, here are a few green things to take you into the weekend:

– This adorable dog just wants to take a dip in the ocean! Me too!
– Have you seen this adopted dog lay in a dog bed for the first time?
– A mongoose takes on 4 lions! Yikes.
– Would you live in a house clinging to a cliff?
– I am so glad that the mister and I decided to embrace “our normal” a long time ago!
– Getting married this fall? I love these DIY wedding edible favors!

Have a great weekend – I will see you back here on Monday!

xo,
Sweet Greens

P.S. The above photo is from our green market that opens again in 1 month! I can’t wait!