I wanted to celebrate Earth Day this year with a simple project (it’s a Tuesday, and school nights are super busy over here) that we could enjoy in our home year-round. Eben and I went to work transforming a handful of leftover wine corks into a trio of super sweet mini succulent planters. They are now hanging on our fridge and bring a little bit of the outdoors and happiness whenever we see them. Jump over to Target for the step-by-step tutorial, and get started – I guarantee you can finish this project up before dinnertime!
Yay! I have a giveaway today that I have been really looking forward to. I know you will love it! It’s sponsored by Stubby Pencil Studio, my go to spot for creative, eco-friendly products for the kids. The prize is a very generous $50 gift certificate!
The reason that I have been looking forward to this giveaway, is two-fold. First, summer is right around the corner, and Stubby Pencil Studio has all of the essentials necessary for a creative summer. Second, this is our first giveaway since the new website launch – hooray!
If Stubby Pencil Studio is new to you, they are all about fantastic products to keep your children excited about getting creative. They have a large selection of art materials, school supplies, books, craft supplies, and classic games. We are huge fans of the art supplies, Eben especially loves the sketchbooks, colored pencils, and markers – his birthday is coming up next month, and he has already told me, all he wants is more art supplies.
It’s wonderful to work with Stubby Pencil Studio because when your child loves art the way mine does, you want them to only use products that are non-toxic and good for the environment. I know that Eben is safe using their modeling clays or paints for his sculptures and paintings.
I have to admit, I smile every time I walk past his closet art studio and see all of those colorful markers, crayons and pencils in the jars on his desk! It’s his happy place, and all kids need a happy place!
You can create a happy place for your kids with Stubby Pencil Studio too – visit them and enter the giveaway below, the winner will be announced on April 29th!
Extra Fun: Use the discount code SAVEGREENS to save 15% on orders through May 15th, 2014. a Rafflecopter giveaway
Going green starts with small steps – it’s those little choices that can equal a huge impact in the long run. Many small steps are easy, affordable and start with the choices that you make when doing your marketing. Here are my 10 favorite ways to green your home – these are very affordable, in fact they all cost less than $10.
1. Ditch It Paper towels and napkins are used only once and then tossed in the trash. Ditch the paper and choose reusable organic cotton dishcloths and napkins instead. This simple step alone will save countless resources and eliminate the gas emissions created during the manufacturing and transportation of these paper products.
2. Bottle It Instead of buying beverages that come in plastic or even glass containers, pick up a BPA free reusable bottle for each member of your family. Keep the bottles with you at all times, attach your child’s to their backpacks when sending them off to school and throw one in your handbag or car for drinks on the go.
3. Bag It If you, your spouse or children take their lunch to school or work everyday, invest in a great reusable lunchbox or bag. Paper and plastic lunch bags are wasteful, since they are tossed after being used only once!
4. Recharge It The next time you need to pick up batteries for the TV or Wii remote, choose an eco-friendly, rechargeable version. Not only do rechargeable batteries save hundreds of single-use batteries from being tossed, they save you money too. Win, win.
5. Trash It Most trash bags on the market are not biodegradable, which means that it will take thousands of years for the trash bag to break down (not to mention the contents inside). Instead, pick up trash bags that are biodegradable and will break down in only a few months.
6. Compost It Instead of throwing those leftovers or salad scraps into the trash, compost them instead. Regardless of the type of home you live in, you can compost. There are many different composter options available, including ones that you can build out of recycled or leftover materials, rolling composters and even small electronic composters for inside a small home or apartment. (However, the later option is more expensive.)
7. Clean It One of the most dangerous, toxic and harmful items in your home, may be your cleaning products. Not only are these conventional products dangerous to the environment, they are dangerous to the health of your family. There are many all-natural household cleaning products available that are eco-friendly and non-toxic, you can even make your own.
8. Go Low-Flow A low-flow shower-head will use less than 2 gallons of water per minute, that is still a lot of water going down the drain. However, it is much better than the 5 gallons per minute that an older shower-head will use. The best option is to turn off the shower while you soap up or shampoo your hair.
9. Bulk Up When you can buy products from the bulk section, not only is it more affordable, but you can bring your own reusable containers, eliminating the need for product packaging.
10. Hang It Instead of drying all of your clothes in the dryer, hang them up to dry. You can utilize a clothesline outside or hang them up in your laundry room. Not only does this save a lot of energy, your clothing will last longer and smell fresher too.
What simple, affordable choices do you choose when greening your everyday routine?
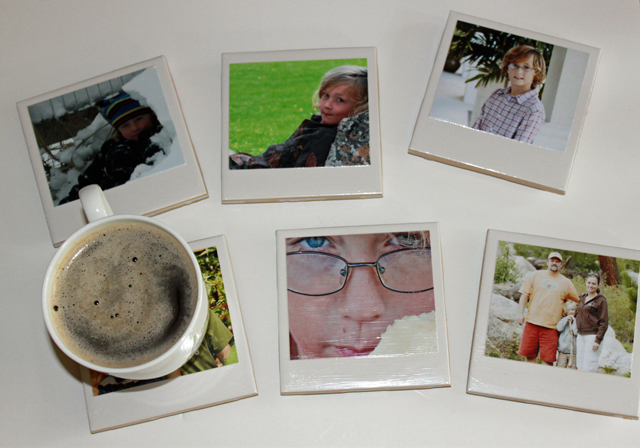
While cleaning out our garage last weekend (New Year’s Resolution #3!), I came across a small box of white ceramic tiles left over from a bathroom remodel that we accomplished many years ago. Instead of tossing them into the donation bin, I thought I could find a way to upcycle them. I considered transforming them into coasters, I have done this before using leftover tiles; however those tiles were different colors and textures, not stark white like the ones I had.
Then, on Sunday, we went to a local parade, while we were there a little girl asked if she could take a photo of Noodles (our Pug) – with her Polaroid camera! That is when I thought of my white tiles and how if I added a photo to them, they would look just like Polaroid photos!
When we arrived home, Eben and I spent the last few hours of winter vacation working on this fun project. I am happy to announce that not only was this a great little project to do with my favorite guy, that coasters turned out fantastically! We are now the happy owners of a fun stack of conversation starting Polaroid inspired photo coasters. The best part – my Polaroid photo coasters are going to be featured in this month’s Green Child Magazine. Hooray!
You can make your own set with my simple step-by-step tutorial, read on to get started:
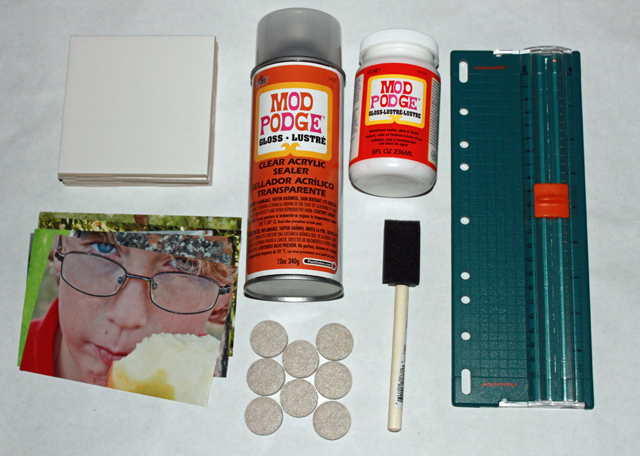
What you will need:
4×4 white ceramic tiles
your favorite photos
Mod Podge
clear acrylic spray
sponge brush
paper cutter
felt circles
Step 1: Pick Your Photos
First things first, you will want to pick out a selection of your favorite photos – one for each tile. Then, using a paper cutter, cut each of your photos down to approximately 3.25 x 3.75 – I eyeballed mine and I think they turned out great.
Step 2: Add the Photos
Wash and dry each of your ceramic tiles, then apply a thin coast of Mod Podge to the back of the photo. Then, position it correctly on your tile – do one photo/tile at a time.
Step 3: Press and Scrap
Use a credit card to smooth out the photo, scrapping off any excess Mod Podge. Make sure that the photo doesn’t slide out of place during the process.
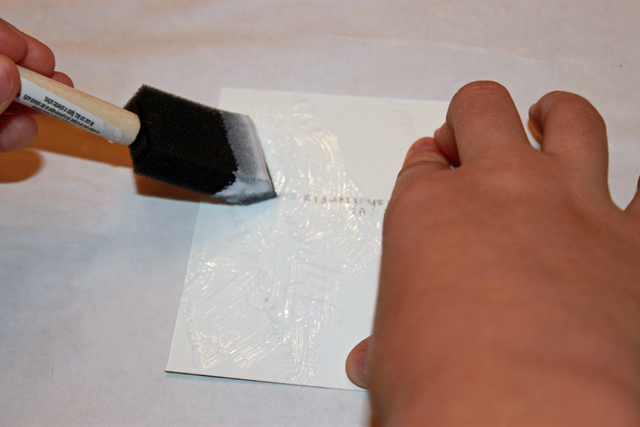
Step 4: Top with Mod Podge
Use your sponge brush to apply a thin layer of Mod Podge over the entire surface of the tiles, including the photo. Let it dry for several hours.
Step 5: Repeat Step 4
Repeat Step 4 several times until you have a strong, thick coat of Mod Podge on the top of the photos (I applied 4 coats). Let it completely dry in between coats – this is very important, if you try to work to quickly the Mod Podge will still be tacky.
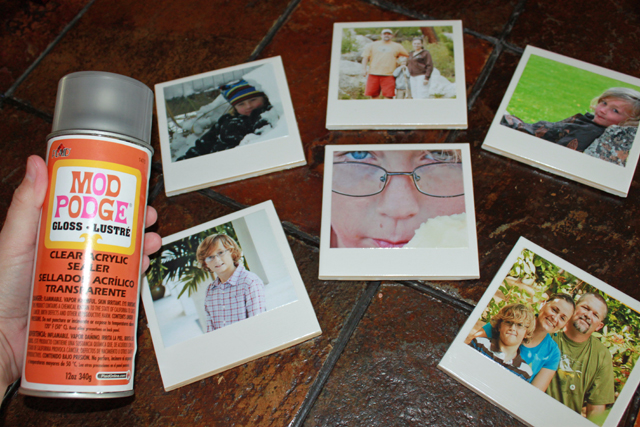
Step 6: Spray with Acrylic Spray
Spray each of the tiles with the clear acrylic spray using short, straight horizontal lines. Let completely dry for at least 15 minutes.
Step 7: Repeat Step 6
Repeat step 6 several times letting the spray completely dry for at least 15 minutes in between coats.
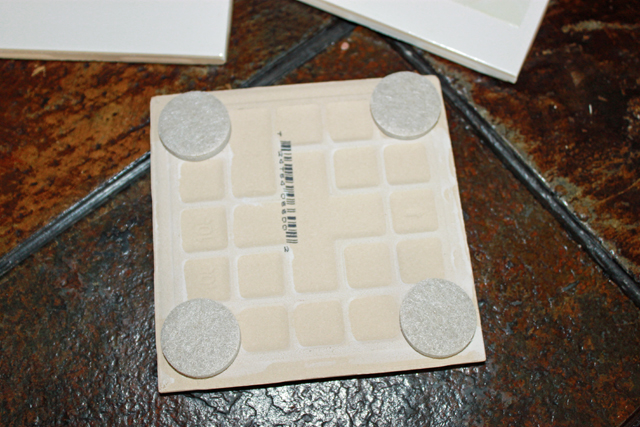
Step 8: Add Felt Dots
Stick felt circles (the same kind you use to put on the bottom of chairs and other pieces of furniture) on the back of the tiles. Wait at least 72 hours before placing anything on top of your photo coasters, allowing the sealer to completely dry – or your beverage mugs will stick!
Step 9: Enjoy and Share the Fun!
Enjoy these fun Polaroid coasters and share them with your friends and family when they come over for tea. Wouldn’t these make fun gifts too?
This summer you may spend time at the beach, whether you live near one or will be visiting one on vacation. One of the easiest and greatest ways to keep kids entertained at the beach on a windy day is with a boogie board. Body-boarding is a ton of fun for kids who are ready to venture out into the waves for a lot of excitement. This sport is great for children of all ages, as long as they are good swimmers and ready for a little splash and speed. Learn how you can get your kids body-boarding the first day that you hit the beach, making for a fun, exciting day in the ocean.


 Yay! I have a giveaway today that I have been really looking forward to. I know you will love it! It’s sponsored by