Tag Archives | eco moms

Eco Baby 101: 5 Steps for Greener Baby Care

Green-BabyBaby’s first year is the toughest phase of many parents’ lives. With all of the demands and details of new parenthood, it can be tough to make eco-consciousness a priority.  The truth is that bringing an entire new person into the world creates a huge impact on the environment—from the thousands (yes, thousands) of diapers he or she will use to the impact your child will later have on the world as an adult who makes daily choices as a consumer and community member. By incorporating environmentally friendly practices now, it will be easier to go green in the future and you’ll be setting a great example for your growing, learning child.  Not only are the following steps green, they’re healthy and safe, too! The following are five first steps to take towards greener baby care.

#1 Breastfeeding
Making the choice to breastfeed has a huge impact on the environment and your child. The American Academy of Pediatrics and World Health Organization advocate exclusive breastfeeding for the first six months of life followed by continued breastfeeding to supplement solid food through 12 months. Countless studies have shown numerous immediate and long-term benefits to both mothers and babies who participate in breastfeeding including reduced incidence of postpartum depression, fewer health issues and increased immunity in babies, and a stronger attachment relationship. On top of the health benefits, it’s free! Formula can be very expensive, especially if your baby does not tolerate cow’s milk protein and needs prescription formula. Formula costs money and takes energy to manufacture, package, and transport. Additionally, most formulas are cow’s milk based so everything that goes into feeding and raising dairy cows comes into play. If your baby is like many who cannot digest cow’s milk protein during their first year of life, you may have to pay extra for special allergy-free formula. Breastfed babies stop eating when they’re full; with formula, it’s a bit harder to predict when baby has had enough, creating waste when extra formula is thrown out after each feed. If you do decide to formula feed your baby, you can make the choice greener by purchasing organic brands or making your own.

#2 Green Diapering
Considering that the average American baby will go through roughly 6,000 diapers during his first two years of life, cloth is by far the greener way to diaper! While the up-front cost is daunting, most parents who chose cloth have estimated that the diapers paid for themselves by the time their baby was eleven months old—and the investment paid higher returns if the diapers were used for multiple children.  Cloth diapering has become increasingly popular and many companies sell organic, colorful, easy-to-use sets that are either sized per age and weight or one-size-fits all. If you are one of the many parents who does not have the time nor resources for the cleanup and laundry that cloth diapering require, there may be a diaper service in your city that offers pickup, cleaning, and drop-off. If you simply can’t commit to cloth, brands like Seventh Generation sell hypoallergenic, chlorine-free, fragrance-free diapers that are easier on the environment and your baby’s bottom. When choosing wipes, a good rule of thumb is to choose fragrance-free wipes with the least number of ingredients to avoid putting unnecessary, harsh additives on your baby’s skin.

#3 Greener Bottles
Several studies have come out recently revealing that even plastic bottles, baby toys, and accessories labeled BPA-free contain BPA in traces high enough to pose a risk to your baby’s health. Fortunately, there are some great companies out there making baby bottles and sippy cups from materials like stainless steel or glass. These options do not contain the harmful PVC, phthlalates, and BPA found in most plastic products.  My personal favorite brand, which I use at home with my daughter, is Pura Kiki. They make stainless steel bottles and sippy cups with silicone nipples and spouts. The bottles are safe, easy to clean, and come in a variety of cute colors.

#4 Homemade Baby Food
While jarred baby food can come in handy when you’re on the go with baby, it is costly to the environment and your wallet overall. Jarred food has a bigger carbon footprint than homemade food because it has to be made and canned in a facility before traveling to your local grocer for you to purchase. One jar or pouch of baby food alone rarely costs more than $1.50, but once baby starts to branch out with solid food she’ll consume multiple jars a day and dozens a week—not to mention the waste that’s produced if she doesn’t finish an entire jar during its shelf life. Making your own baby food certainly takes more time than buying jars, but this time commitment can be minimized by choosing one day a week or even month to mass-produce purees. After the up-front cost of a baby food blender and freezer trays, homemade baby food is far cheaper then store-bought. A couple of organic sweet potatoes at $1.19 a pound makes dozens of single servings. Plus, when you make your own food you choose exactly what goes into it!

#5 When Safe, Choose Used
Safety regulations on baby products are constantly developing and changing as new research surfaces and manufacturers learn by trial and error what is safe and unsafe. There are items that came onto the market during our one year old daughter’s short lifetime that have already been recalled. Used baby clothes are pretty much guaranteed to be safe. While there’s nothing like seeing your baby in a brand new outfit that you picked out just for her, buying new for baby requires purchasing a new wardrobe every three months or less—plus, your baby is guaranteed to stain everything you put her in eventually. Reusing baby clothes is cheaper than buying new and many moms like knowing that cherished memories will live on through another child wearing her baby’s old clothes.

These are just a few of the many, many ways you can begin to green your baby care! What are some of your favorites?
 

The Ecocentric Mom Box is the Perfect Treat for Summer

ecocentric mom box, subscription service
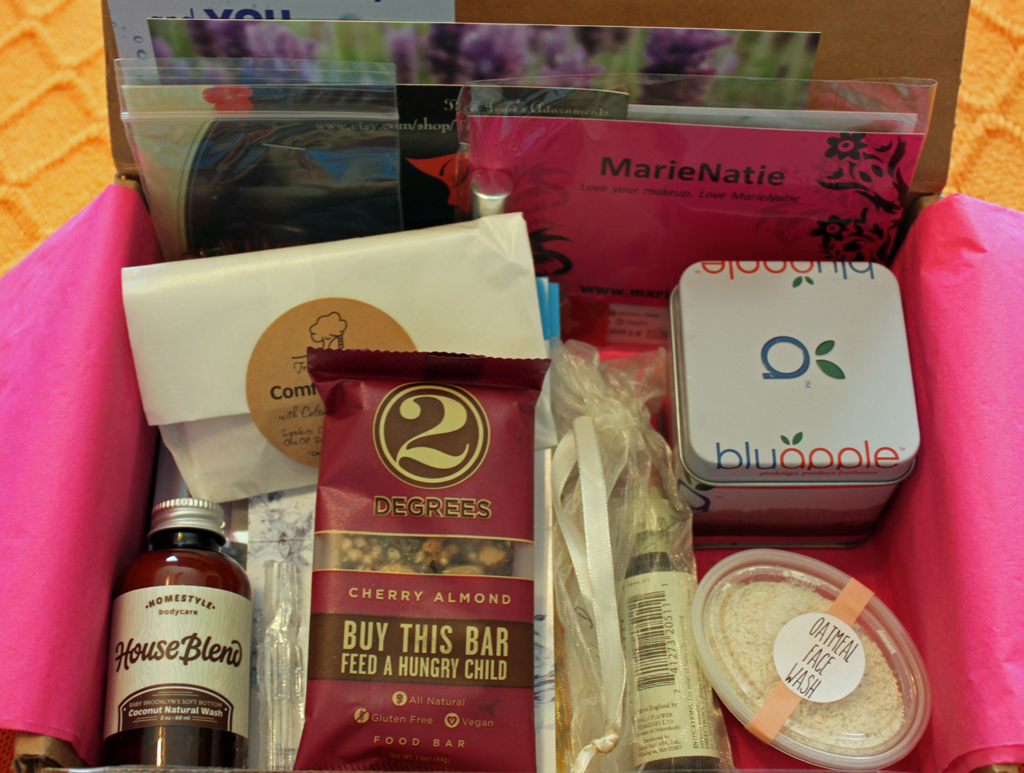
The spring Ecocentric Mom Box was full of wonderful goodies that are perfect for spring and summer! If you are considering joining a subscription box service full of eco-friendly goodies, Ecocentric Mom is for you! A subscription would make a wonderful Mother’s Day gift too.

Here’s a peek inside the March/April Box:

  1. Bach Original Flower Remedies
    I really enjoyed these remedies, I received Elm and keep it on my desk. I pick it up when I am feeling overwhelmed and it really helps be to recenter!
    + $19.98 per 20ml bottle
  2. Eco-Friendly Organic Acai Seed Bead Hair Barrette
    This hair barrette is super cute and would be perfect for a little girl. All of the jewelry is eco-friendly and sustainable too!
    + $5
  3. 2 Degrees Food Bar
    For every 2 Degrees bar you buy, they donate a meal to a hungry child! These bars are also gluten-free, vegan, all natural and GMO free.
    + $1.99
  4. Treefort Naturals Comfrey Salve
    I am a huge fan of salves and keep one in my handbag at all time. They are perfect for burns and scraps – so with a kiddo, it is a must.+ $8
  5. Organic Caffeine Free Roman Provence Rooibos Tea
    I love tea, and this fruity berry flavored tea is one of my favorites!
    + $6.99-8.99/2 oz. bag, brews 20-25 cups
  6. Powernap 2-CD Set
    Yay! Who doens’t love a power nap! This CD features ambiant music which envelops you – I look forward to giving this one a try!
    + $9.99
  7. Oatmeal Grapefruit Face Wash Powder by Homespum Northwest
    This facewash has to be the yummiest smelling one out there – and super gentle on my skin too!
    + $3.50/2 oz
  8. Bluapple – Prolongs Produce Freshness
    Just place this super cute blue apple in with your produce and you will prolong its freshness.
    + $9.99/2 pack
  9. House Blend Organics Coconut Body Wash
    I love coconut and this body wash worked really well on my dry skin – it’s super hydrating.
    + $14.95
  10. MarieNatie All Natural Lip Gloss
    Free from harsh chemicals, this natural lip gloss packs a lot of color!
    + $5
  11. Sport Suds Laundry Detergent
    This laundry detergent removes funky smells from clothes and sporting gear – perfect if you have an active teenager!
    + $20.95/400g Jar/34 loads

10 Simple Ways to Green Your Home For Under $10

by Jennie

Going green starts with small steps – it’s those little choices that can equal a huge impact in the long run. Many small steps are easy, affordable and start with the choices that you make when doing your marketing. Here are my 10 favorite ways to green your home – these are very affordable, in fact they all cost less than $10.

1. Ditch It Paper towels and napkins are used only once and then tossed in the trash. Ditch the paper and choose reusable organic cotton dishcloths and napkins instead. This simple step alone will save countless resources and eliminate the gas emissions created during the manufacturing and transportation of these paper products.

2. Bottle It Instead of buying beverages that come in plastic or even glass containers, pick up a BPA free reusable bottle for each member of your family. Keep the bottles with you at all times, attach your child’s to their backpacks when sending them off to school and throw one in your handbag or car for drinks on the go.

3. Bag It If you, your spouse or children take their lunch to school or work everyday, invest in a great reusable lunchbox or bag. Paper and plastic lunch bags are wasteful, since they are tossed after being used only once!

4. Recharge It The next time you need to pick up batteries for the TV or Wii remote, choose an eco-friendly, rechargeable version. Not only do rechargeable batteries save hundreds of single-use batteries from being tossed, they save you money too. Win, win.

5. Trash It Most trash bags on the market are not biodegradable, which means that it will take thousands of years for the trash bag to break down (not to mention the contents inside). Instead, pick up trash bags that are biodegradable and will break down in only a few months.

6. Compost It Instead of throwing those leftovers or salad scraps into the trash, compost them instead. Regardless of the type of home you live in, you can compost. There are many different composter options available, including ones that you can build out of recycled or leftover materials, rolling composters and even small electronic composters for inside a small home or apartment. (However, the later option is more expensive.)

7. Clean It One of the most dangerous, toxic and harmful items in your home, may be your cleaning products. Not only are these conventional products dangerous to the environment, they are dangerous to the health of your family. There are many all-natural household cleaning products available that are eco-friendly and non-toxic,  you can even make your own.

8. Go Low-Flow A low-flow shower-head will use less than 2 gallons of water per minute, that is still a lot of water going down the drain. However, it is much better than the 5 gallons per minute that an older shower-head will use. The best option is to turn off the shower while you soap up or shampoo your hair.

9. Bulk Up When you can buy products from the bulk section, not only is it more affordable, but you can bring your own reusable containers, eliminating the need for product packaging.

10. Hang It Instead of drying all of your clothes in the dryer, hang them up to dry. You can utilize a clothesline outside or hang them up in your laundry room. Not only does this save a lot of energy, your clothing will last longer and smell fresher too.

What simple, affordable choices do you choose when greening your everyday routine?

How to Transform Leftover Bathroom Tiles into Polaroid Photo Coasters

Polaroid-Coasters-7While cleaning out our garage last weekend (New Year’s Resolution #3!), I came across a small box of white ceramic tiles left over from a bathroom remodel that we accomplished many years ago. Instead of tossing them into the donation bin, I thought I could find a way to upcycle them. I considered  transforming them into coasters, I have done this before using leftover tiles; however those tiles were different colors and textures, not stark white like the ones I had.

Then, on Sunday, we went to a local parade, while we were there a little girl asked if she could take a photo of Noodles (our Pug) – with her Polaroid camera! That is when I thought of my white tiles and how if I added a photo to them, they would look just like Polaroid photos!

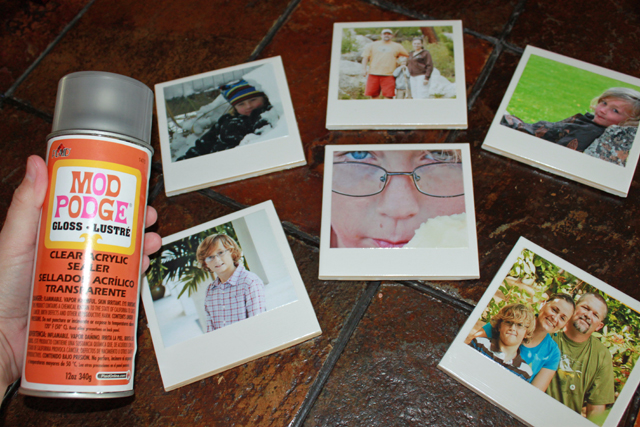
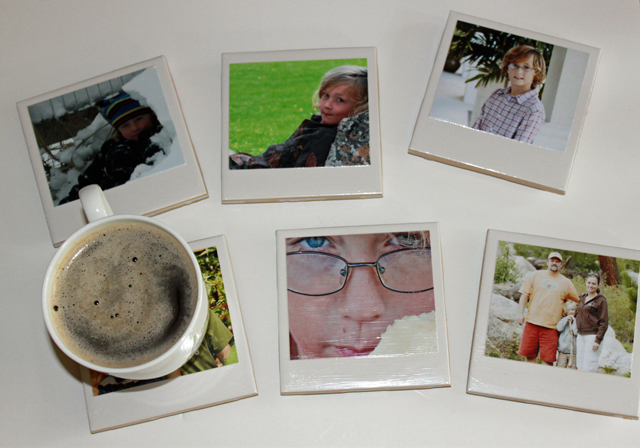
When we arrived home, Eben and I spent the last few hours of winter vacation working on this fun project. I am happy to announce that not only was this a great little project to do with my favorite guy, that coasters turned out fantastically! We are now the happy owners of a fun stack of conversation starting Polaroid inspired photo coasters. The best part – my Polaroid photo coasters are going to be featured in this month’s Green Child Magazine. Hooray!

You can make your own set with my simple step-by-step tutorial, read on to get started:

Polaroid-Coasters-1

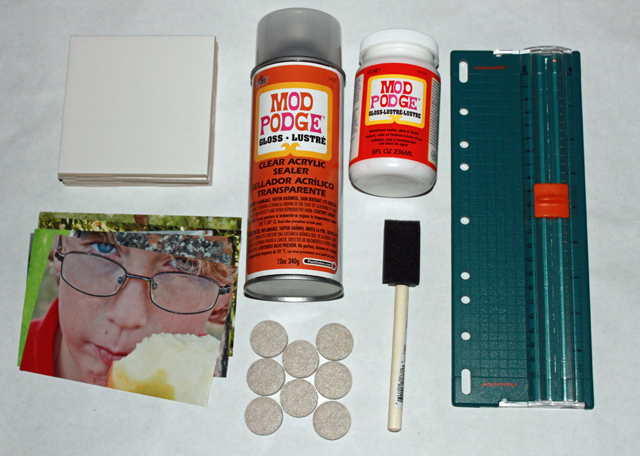
What you will need:

  • 4×4 white ceramic tiles
  • your favorite photos
  • Mod Podge
  • clear acrylic spray
  • sponge brush
  • paper cutter
  • felt circles
Polaroid-Coasters-2

Step 1: Pick Your Photos
First things first, you will want to pick out a selection of your favorite photos – one for each tile. Then, using a paper cutter, cut each of your photos down to approximately 3.25 x 3.75 – I eyeballed mine and I think they turned out great.

Polaroid-Coastes-3

Step 2:  Add the Photos
Wash and dry each of your ceramic tiles, then apply a thin coast of Mod Podge to the back of the photo. Then, position it correctly on your tile – do one photo/tile at a time.

Polaroid-Coastes-3

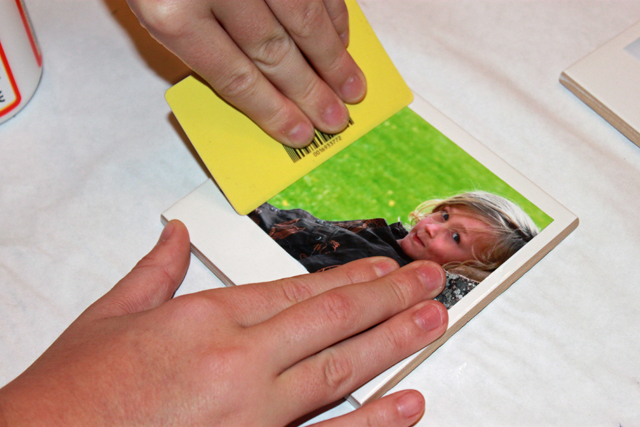
Step 3: Press and Scrap
Use a credit card to smooth out the photo, scrapping off any excess Mod Podge. Make sure that the photo doesn’t slide out of place during the process.

Polaroid-Coasters-4

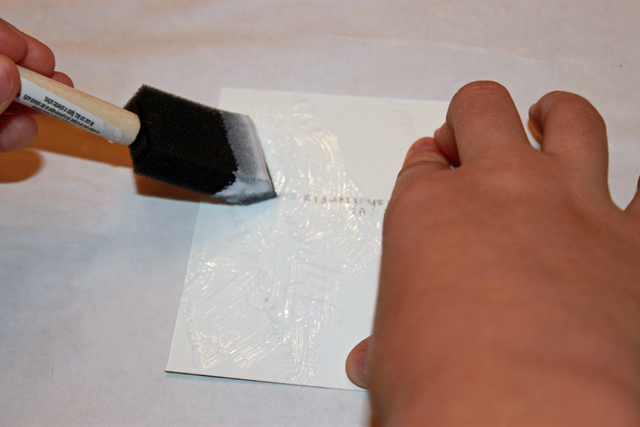
Step 4: Top with Mod Podge
Use your sponge brush to apply a thin layer of Mod Podge over the entire surface of the tiles, including the photo. Let it dry for several hours.

Step 5: Repeat Step 4
Repeat Step 4 several times until you have a strong, thick coat of Mod Podge on the top of the photos (I applied 4 coats). Let it completely dry in between coats – this is very important, if you try to work to quickly the Mod Podge will still be tacky.

Polaroid-Coasters-8

Step 6: Spray with Acrylic Spray
Spray each of the tiles with the clear acrylic spray using short, straight horizontal lines. Let completely dry for at least 15 minutes.

Step 7: Repeat Step 6
Repeat step 6 several times letting the spray completely dry for at least 15 minutes in between coats.

Polaroid-Coasters-9

Step 8: Add Felt Dots
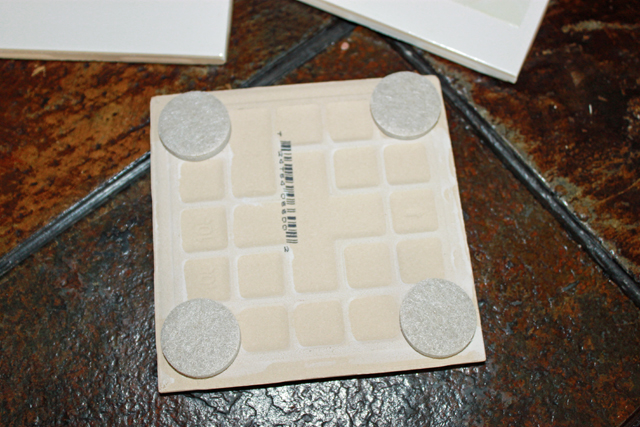
Stick felt circles (the same kind you use to put on the bottom of chairs and other pieces of furniture) on the back of the tiles. Wait at least 72 hours before placing anything on top of your photo coasters, allowing the sealer to completely dry – or your beverage mugs will stick!

Polaroid-Coasters-7

Step 9: Enjoy and Share the Fun!
Enjoy these fun Polaroid coasters and share them with your friends and family when they come over for tea. Wouldn’t these make fun gifts too?